Elevate Your Porch's Style with a Stylish DIY Wood Privacy Screen
There is nothing quite like sitting on the porch to unwind after a long day. However, it might be hard to relax if there is no privacy, particularly if your neighbors are close or sidewalk traffic is high. The nice thing is that there are plenty of tips for adding a touch of privacy to your patio or porch. This particular project is a simple, inexpensive DIY solution that will have you easing into soothing tranquility in no time. All you need to do is attach a couple of sturdy vertical boards to your porch, then span them with horizontal planks spaced just far apart enough to let in light. The resulting horizontal slatted screen is attractive and will provide plenty of privacy.
It's important to use wood that can stand up to being outdoors. Cypress, redwood, and white oak are all naturally weather-resistant, but pressure-treated lumber will withstand the elements well for years to come. One TikTokker chose cedar planks for just under three bucks each for the horizontal privacy planks. Pine also works. Whatever you choose, consider adding protective outdoor finish, such as KILZ waterproofing wood stain and sealer . Choose a color that complements your decor or a clear finish for a natural look.
In addition to the wood, you'll need exterior deck screws and a screwdriver. You can use a hammer and nails, but a cordless nail gun gets the job done quickly. Another power tool to have is a miter saw for straight cuts. You'll also need a tape measure, level, pencil, and perhaps a ladder, depending on your particular porch setup. Lastly, you'll need something to use as a spacer — like another board — to keep your planks equidistant.
Read more: Huge Mistakes That Are Attracting Wasps To Your Yard
Make Your Own Privacy Screen
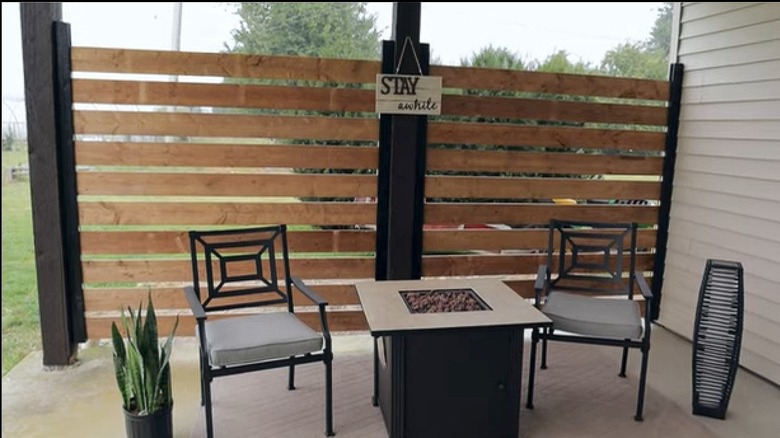
Privacy is one update that will add value to your home . To begin your porch screen, measure the height between your porch floor or railing and the ceiling. Cut vertical support boards to length. Next, attach one vertical board to the end of your porch against your house. Be sure the board is plumb before attaching it. Then attach another near the post at the end of the porch where you want the privacy wall to extend to. Measure the distance from the edge closest to the house to the edge farthest from the house to determine your slat length. Cut your slats to size. Attach the first plank, starting from the bottom and working your way up. This will make it easier to use the spacer.
For a spacer, use something that equals the distance you want between slats. To let in more sunlight, use the full width of a 2-by-4 offcut. For a little more privacy, use the 2-by-4's thickness. Or vary the spacing for an interesting design. Depending on the length of your slats, you may need an additional spacer. Also, if your slats are long, you may need additional vertical boards along the course of your wall for support.
Alternatively, you can build the screen on your porch floor in a frame and pivot it into place, possibly attaching a base. Or make it mobile by creating freestanding screens, perfect for delineating activity zones in a yard. When the job is done, apply a protective finish. Attach curtains for additional privacy, or add value by using it as a DIY wall-mounted plant trellis . Now that you're a pro at creating a friendly boundary, consider these simple tricks to add privacy to your backyard .
Read the original article on Outdoor Guide .
Post a Comment for "Elevate Your Porch's Style with a Stylish DIY Wood Privacy Screen"
Post a Comment